When you configure a proxy server on your Mac, applications will send their network traffic through the proxy server before going to their destination. This may be required by your employer to bypass a firewall, or you may want to use a proxy to bypass geoblocking and access websites that aren’t available in your country.
The proxy server you set here will be used by Apple Safari, Google Chrome, and other applications that respect your system proxy settings. Some applications, including Mozilla Firefox, can have their own custom proxy settings independent from your system settings.
Open the System Preferences application by clicking on it in your Dock, or going to the Apple menu > System Preferences. Click the “Network” icon.

Select the network connection you use in the list. For example, if you want to configure the proxies used while connected to Wi-Fi networks, select “Wi-Fi”. If you want to configure the proxies used while connected to wired networks, click “Ethernet”.
Click the “Advanced” button at the bottom right corner of the Network window.

Select the “Proxies” tab. You’ll need to configure a proxy by enabling one or more of the protocol checkboxes here.
To have your Mac detect whether a proxy is necessary and automatically configure the proxy settings, enable the “Auto Proxy Discover” checkbox. Your Mac will use the Web Proxy Auto Discover protocol, or WPAD, to automatically detect whether a proxy is necessary. This setting may be used on business or school networks, for example.
Even after enabling this option, your Mac will only use a proxy if one is detected using WPAD. If you never want your Mac to use a proxy, even if one is detected with WPAD, leave this box unchecked.

To use an automatic proxy configuration script, also known as a .PAC file, enable the “Automatic Proxy Configuration” checkbox. Enter the address of the script in the URL box. Your network administrator or proxy provider will provide you with the address to the proxy configuration script, if you need one.
If you don’t need to use an automatic proxy configuration script to configure your proxy settings, leave this box unchecked.

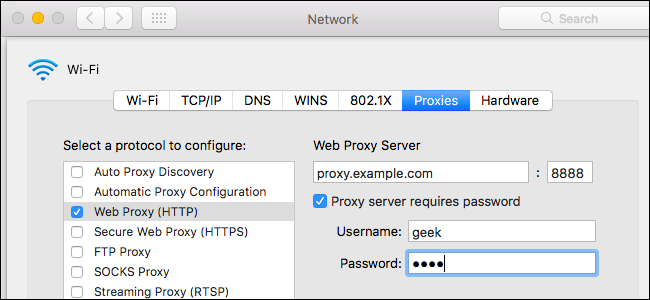
To manually configure a proxy, you’ll need to enable one or more of the “Web Proxy (HTTP)”, “Secure Web Proxy (HTTPS)”, “FTP Proxy”, “SOCKS Proxy”, “Streaming Proxy (RTSP)”, and “Gopher Proxy” checkboxes. Enter the address and port number of the proxy for each option you enable. If you were provided with a username and password for the proxy server, enable the “Proxy server requires password” option and enter the username and password.
For example, let’s say you want to configure a proxy that’s used for HTTP, HTTPS, and FTP connections. You’d check the “Web Proxy (HTTP)”, “Secure Web Proxy (HTTPS)”, and “FTP Proxy” boxes. After checking each, you’d enter the address and port of the proxy server into the right pane. If you want to use the same proxy server for all three, you’d enter the same address three times. if you were provided with different proxy server addresses for different protocols, you’d enter different proxy server addresses for these connections.
If you don’t want to manually configure a proxy, ensure all these boxes are unchecked.

The remaining settings allow you to bypass the proxy server when connecting to specific addresses and domains you configure.
The “Exclude simple hostnames” checkbox allows you to bypass the proxy for all “simple hostnames”. These are often used on local networks and intranets. For example, a network might have a local website at “portal” or a local file server at “fileserver”. In other words, users may have to plug “http://portal/” or “https://fileserver/” into their address bar to access these systems. This type of hostname only works on a local network. By checking this box, you can bypass the proxy for all simple hostnames on networks you connect to.
The “Bypass proxy settings for these Hosts & Domains” box contains a list of host names, domain names, and IP address ranges that won’t be accessed through the proxy. For example, it contains “*.local” by default. The “*” here is a wildcard and matches anything. This means anything that ends in .local, including server.local, database.local, and anything.local, will be accessed directly without going through the proxy.
To add your own domain names and addresses, just separate each with a comma and a space. For example, to tell your Mac to access howtogeek.com without going through the proxy, you’d change the line to:
*.local, 192.254/16, howtogeek.com

If you have issues connecting to FTP servers after configuring an FTP proxy, ensure the “Use Passive FTP Mode (PASV)” option is enabled at the bottom of the window here. It’s enabled by default.

Click “OK” to save your settings when you’re done. Click “Apply” at the bottom right corner of the Network settings screen and your changes will take effect.

If there’s a problem with the proxy server settings—for example, if the proxy server goes down or if you entered the details incorrectly—you’ll see a network error message when using applications like Safari and Google Chrome. For example, Safari will say it can’t find the server you’re trying to access, while Chrome will display a more descriptive “ERR_PROXY_CONNECTION_FAILED” error message. You’ll need to fix your proxy server settings to continue.


0 comments:
Post a Comment