


If you want to root, flash a custom ROM, or otherwise dig into the innards of your Android phone, a custom recovery like TWRP is a great way to do so. Here’s how to flash it on your phone.
Your phone’s “recovery environment” is a piece of software that you rarely see. It’s what your phone uses to install Android updates, restore itself to factory settings, and perform other tasks. Google’s default recovery mode is pretty basic, but third-party recoveries–like the Team Win Recovery Project (or TWRP)–allow you to make backups, install ROMs, root your phone, and do a heck of a lot more. So if you’re looking to heavily tweak your phone, you’ll probably need one. You can read more about how custom recoveries work in our article on the subject. Today, we’re going to show you how to install one.
First: Unlock Your Device and Make Sure It’s Compatible
This process will only work if you’ve unlocked your booloader. So if you haven’t done that yet, check out our guide to get started. Then, when you’ve finished, come back here to flash TWRP. (If your phone’s bootloader isn’t unlockable, you’ll have to flash TWRP using some other method.)
In addition, make sure there is a version of TWRP available for your phone, and do a little research on the TWRP website and XDA Developers to make sure there aren’t any quirks. For example: some new phones like the Nexus 5X come encrypted by default, but when TWRP first came out for the Nexus 5X, it didn’t support encrypted phones. So Nexus 5X users either had to wipe and decrypt their phone before installing TWRP, or wait a few months for an update to TWRP that supported encrypted devices. Make sure you’re aware of any device-specific quirks like this before you start the process.
You’ll need the Android Debug Bridge (ADB) installed on your computer to perform this process, as well as your phone’s USB drivers. If you unlocked your bootloader the official way, you probably have them already, but if not, check out this guide for instructions on how to get them.
Lastly, back up anything on your phone that you want to keep. This process shouldn’t wipe your phone, but copying your photos and other important files to your PC is always a good idea before you go messing with the system.
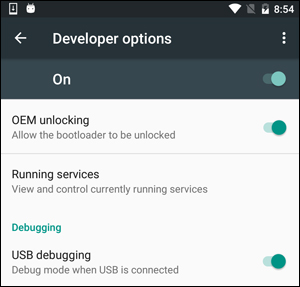
Step One: Enable USB Debugging
 Next, you’ll need to enable a few options on your phone. Open your phone’s app drawer, tap the Settings icon, and select “About Phone”. Scroll all the way down and tap the “Build Number” item seven times. You should get a message saying you are now a developer.
Head back to the main Settings page, and you should see a new option near the bottom called “Developer Options”. Open that, and enable “USB Debugging”. Enter your password or PIN when prompted, if applicable.
Once that’s done, connect your phone to your computer. You should see a popup entitled “Allow USB Debugging?” on your phone. Check the “Always allow from this computer” box and tap OK.
Step Two: Download TWRP for Your Phone
Next, head to TeamWin’s website and go to the Devices page. Search for your device, and click on it to see the TWRP downloads available for it.

This page will usually tell you any device-specific information you need to know. If you don’t understand what something means, you can usually read more by searching the XDA Developers forum.
Head to the “Download Links” section on that page and download the TWRP image. Copy it to the folder in which you have ADB installed and rename it to
twrp.img. This will make the install command a bit easier later on.Step Three: Reboot Into Your Bootloader
In order to flash TWRP, you’ll need to boot into your phone’s bootloader. This is a bit different for every phone, so you may have to Google instructions for your specific device. You can do it on many modern devices by turning off your phone, then holding the “Power” and “Volume Down” buttons for 10 seconds before releasing them.
You’ll know you’re in your bootloader because you’ll get a screen similar to this:

Your phone’s bootloader may look a little different (HTC’s have a white background, for example), but it will usually contain some similar text. You can find more information on how to reach your specific phones bootloader with a quick Google search, so feel free to do that now before continuing.
Step Four: Flash TWRP to Your Phone
Once in bootloader mode, connect your phone to your PC with a USB cable. Your phone should indicate that the device is connected. On your computer, open the folder in which you’ve installed ADB, and Shift+Right Click on an empty area. Choose “Open a Command Prompt Here”. Then, run the following command:
fastboot devices
The command should return a serial number, indicating that it can recognize your phone. If it doesn’t, go back and make sure you’ve done everything properly up until this point.
If your device is recognized by fastboot, it’s time to flash TWRP. Run the following command:
fastboot flash recovery twrp.img
If all goes well, you should see a success message in your Command Prompt window.

Step Five: Boot Into TWRP Recovery
Unplug your phone and use the volume down key to scroll to the “Recovery” option in your bootloader. Press the volume up or power button (depending on your phone) to select it. Your phone should reboot into TWRP.
If TWRP asks you for a password, enter the password or PIN you use to unlock your phone. It will use this to decrypt your phone so it can access its storage.
TWRP may also ask if you’d like to use TWRP in “Read Only” mode. Read Only mode means TWRP will only exist on your phone until you reboot it. This is less convenient, but it also means TWRP won’t permanently alter your system, which is useful for some people. If you aren’t sure, tap “Keep Read Only”. You can always repeat steps three and four of this guide to re-flash TWRP later when you want to use it.
When you’re done, you’ll see the TWRP main screen. You can use this to create “Nandroid” backups, restore previous backups, flash ZIP files like SuperSU (which roots your phone), or flash custom ROMs, among many other tasks.

Right now, the most important thing you should do is back up your phone before you make any other changes.
Tap the “Backup” button on the main TWRP screen. Select “Boot”, “System”, and “Data” and swipe the bar at the bottom to back them up. (You may also want to tap the “Name” option along the top to give your backup a more recognizable name.)
The backup will take a while, so give it time. When it finishes, head back into the Backup menu. Uncheck all the options and scroll to the bottom. If you have a special partition listed after “Recovery”, such as WiMAX, PDS, or EFS, check it, and perform one more backup. This partition usually contains your EFS or IMEI information, which is crucial. If it ever becomes corrupted, you’ll lose data connectivity and can restore this backup to make your phone function again.
0 comments:
Post a Comment