


Making selections and masks is one of the most fundamental Photoshop skills. If you want to change your model’s eye color or remove a pesky photobomber, you need to be able to select only the area of the image you want to effect while keeping everything else safe.
There are dozens of ways to create selections and masks in Photoshop, but in the June 2016 update, Adobe brought a lot of them together into one place: the Select and Mask Workspace. Let’s look at how to use it.
For this article, I’m going to assume you have a basic understanding of how Photoshop works. If you don’t, check out our detailed eight part guide to learning Photoshop and our lesson on Layers and Masks.
Getting to the Select and Mask Workspace
With an image open in Photoshop, there are a few ways to get to the Select and Mask Workspace. Select the Layer you want to work with, then:
- Go to Select > Select and Mask.
- Press the keyboard shortcut Control+Alt+R (Command+Option+R on a Mac).
- Click a selection tool like the Lasso or Quick Select tool, then and press the “Select and Mask…” button in the Options Bar.
- With the Layer Mask selected, click the “Select and Mask…” button in the Properties panel.

That should take you to the main Select and Mask workspace, where most of your work will take place.
The Select and Mask Workspace
Once you’re in the Select and Mask Workspace, this is what you’ll see.

Let’s look at each part of the interface in turn.
- On the left side of the screen you’ve got the Toolbar. Instead of the full Photoshop toolset, you’re limited to the Quick Selection Tool, the Refine Edge Brush, the Brush Tool, the Lasso Tool (and underneath it, the Polygonal Lasso Tool). There are also the Hand and Zoom Tools for moving about the image.
- The Tool Options bar at the top of the screen has all the options for the currently selected tool.
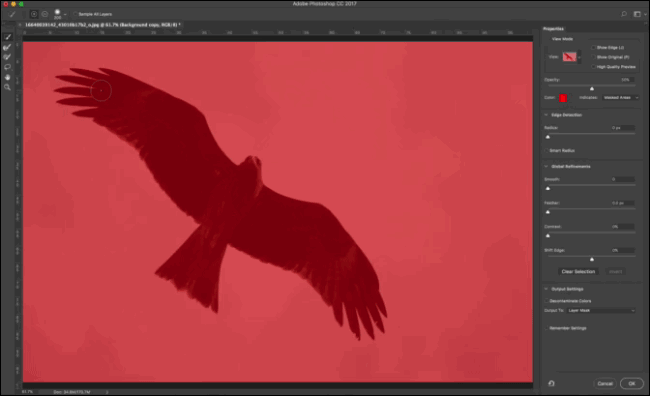
- On the right hand side of the screen you have the Properties panel. At the top of that panel, you’ll see View options. These control how the selection or mask you are creating appears. Right now, any unselected area has a red overlay. As I have not selected anything yet, my entire image has a red overlay.
- Below that, you have Edge Detection, which controls the size of the areas Photoshop treats as edges.
- Next is Global Refinements, which adjust the characteristics, like Feather or Contrast, of the selection.
- Finally, Output Settings determine how the selection is sent back to the regular Photoshop Workspace.
Here’s how to use those tools to make perfect selections every time.
The Selection Tools
The most important part of the Select and Mask Workspace are the selection tools. They’re what you’ll use to build your selection.

The Quick Select Tool works like a brush that automatically selects similar areas to where you’re painting. In the GIF below, just by painting over the bird with the Quick Select Tool I get a rough selection of everything.
The Refine Edge Brush tells Photoshop what areas of your image are edges. It’s great for getting better edges around soft details like the feathers in the GIF below.

The Brush Tool is for manually painting in a selection. If Photoshop’s automated tools aren’t giving you the selection you want or you just want to tweak something, use the Brush. It’s more time consuming but it can give you the best results.

By default with all three tools, when you paint you add to the selection. You can remove from the selection by holding down Alt or Option while you paint.
Finally, the Lasso Tool and Polygonal Lasso Tool are for selection large areas of the image. If you use a Wacom Graphics Tablet, you can draw in a relatively accurate selection, but if you’re using a mouse or trackpad you’ll only be able to manage something very rough.

The View Mode Options
One of the most useful features of the Select and Mask Workspace is how it lets you use different views to see exactly what is and isn’t selected.

In the View dropdown, you can select from Onion Skin, Marching Ants, Overlay, On Black, On White, Black & White, and On Layers. You can see what each option looks like below.

To cycle between the View Modes, press the F key on your keyboard. Depending on what you’re trying to select, each View Mode will give you a different perspective. I normally use Overlay for most things.
Some View Modes have the option to change the Color, Opacity or what the view represents. You can change that in the View Mode Options.
If the Show Edge checkbox is checked, Photoshop will highlight the areas it considers edges.

Show Original shows what the original selection looked like. High Quality Preview forces Photoshop to render a more accurate preview, although it will slow down the tools you’re using.
Edge Detection Options

As well as the Refine Edge Brush, you can also use the Edge Detection Options to tell Photoshop how to interpret the areas of your selection.
The Radius determines how big an area Photoshop treats as the edge. Use a low value for hard edges and a larger one for soft edges. If you’re not sure what value to go with, just play around with the slider and see how it affects your selection.
Smart Radius tells Photoshop to use a different radius for different parts of the selection. If you’re selecting something that has both hard and soft edges, like the bird in my example, turn Smart Radius on.
Global Refinements

Global Refinements adjust the overall selection. Its options include the following:
- Smooth evens out any jagged edges. The higher the value, the more the edges are smoothed.
- Feather softens the edges of the selection. Very few images have things with perfectly crisp edges, so adding a small amount of feathering to your selections generally makes them look more realistic.
- Contrast hardens soft edges. If the edges of the selections are too soft, add contrast to make them harder. It is basically the opposite of Feather.
- Shift Edge either pulls the selection edge in (negative values) or pushes it out (positive values). If there is a color fringe around your selection, pulling the selection in a few percent can remove it.
- Finally, the Clear Selection button resets the current selection and the Invert button inverts the selection; deselected areas become selected and vice versa.
Again, if you’re not sure what exact values your selection needs, play around with the sliders and see what works well.
Output Settings

Output Settings control how the work you’ve done in Select and Mask is sent back to Photoshop.
If there is a color cast on the edges, Photoshop will try to fix it if Decontaminate Colors is checked.
From the Output To dropdown, you can select how the selection is sent to Photoshop. You can choose from:
- Selection,
- Layer Mask
- New Layer
- New Layer with Layer Mask
- New Document
- New Document with Layer Mask.
I’d recommend using either Layer Mask or New Layer with Layer Mask.
Putting It All Together: The Select and Mask Workspace Workflow
Now that you’ve some idea as to what each part of the Select and Mask Workspace does, here’s how it all fits together into a typical workflow. I’m using this great bird photo from SamuelRodgers752 Flickr.
Open the image you want to edit in Photoshop and duplicate it to a new layer by going to Layer > Duplicate or using the keyboard shortcut Control+J (or Command+J on a Mac).
Enter the Select and Mask Workspace.

Use the Quick Select Tool to create a rough selection.

Use the Refine Edge Brush to paint along any edges where the selection isn’t perfect.

Use the Brush Tool, Edge Detection Options and Global Refinements to fine tune the selection. To get different perspectives, swap between the View Modes.
Select the Output Mode, such as Layer Mask, and click OK to send the selection back to Photoshop.
Now, you can do what you like such as replace the background with a solid color or, as you can see below, I’ve added in this much more dramatic sky courtesy of Flickr user Owwe.

Even when you zoom in really close, you can see we’ve got a really good selection, thanks to the Select and Mask Workspace.

The Select and Mask Workspace brings Photoshop’s best selection tools together into one module. It’s the simplest way to create awesome selections.
0 comments:
Post a Comment