


When you build a website or blog, populating it with content is just one step of the process. For some, it’s as simple as writing up a few basic content pages, writing blog posts on a regular schedule, and that’s it. For others—especially those working in complex industries, their content needs might be a little bit more demanding.
That’s when content starts to get lengthy. I’m talking 5,000+ word blog posts, here. The subject matter might totally lend itself to that many words but a careful balancing act must be accommodated for: what’s the right length to thoroughly cover the topic at hand without making your readers’ eyes glaze over?
Long content is what we’re going to talk about today. And as always, it’ll have a WordPress bent so all the organizational tips offered will be catered to fellow users and developers of this CMS. We’ll start with a discussion of how to determine if your content actually needs to be long then move into some actionable tips you can try out today. Happy organizing!
Is This Necessary?
Before we delve into the specifics of long content organization, I think it’s really important to ask yourself if your content even needs to be long in the first place. I know that’s incredibly broad, so here are a few questions to ask yourself to get to the heart of it:
- What subject matter does the content cover?
- Does it encompass one or several topics?
- If it covers multiple topics, would it make sense to split the content into multiple blog posts?
- Have you considered turning your long-form content into a post series?
- Does your content really need to be all on one page?
If you’re thinking about breaking your long content up into multiple posts, you do need to consider a couple of things. Lengthier content can be viewed by Google and your site visitors as an ultimate resource on a given topic. Breaking up the content could diminish that effect. On the flip side, turning long content into a post series means you get more bang for your buck. That is, you have fresh content to post to your site or blog for several days, rather than if you just threw it all up there at once.
if it makes sense for all the content to be kept together on one page and in one post, then you must consider how users will interact with it.
Navigational Organization
A long page of content that offers no places to stop and no means of navigating throughout it is not very user-friendly. And content that isn’t user-friendly is less likely to be read all the way through, less likely to be shared, and less likely to make a positive impact for your business. That’s why it’s imperative you apply at least one navigational method to your lengthy posts and pages.
Table of Contents
One of the best ways to organize long-form content is to use a table of contents. I mean, it works for books, right?
While you can manually set up a table of contents by setting your sub headers as anchors and linking to them, this can be time consuming and if you’re like every single one of us online business people, you know that time is money! That’s why I’d recommend using a plugin to get the job done.
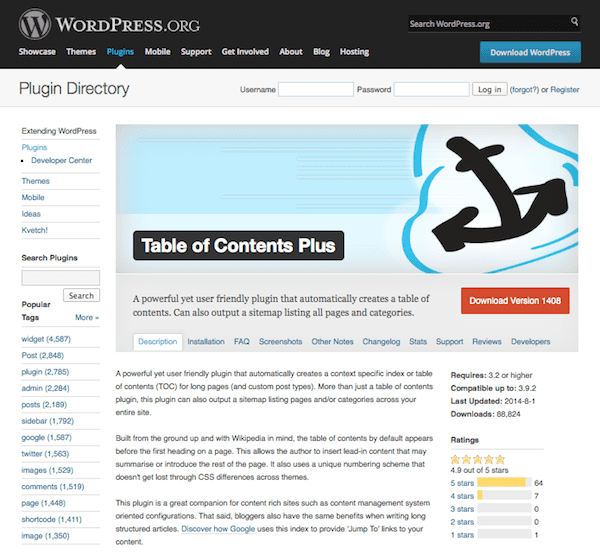
There are several out there but one that I particularly like is Table of Contents Plus. It makes for the easy organization of lengthy content. It allows you to link to subheadings on the same page or post without having to manually set up those anchors. Tuts+ offers a nifty tutorial on how to modify this plugin to work with multi-page content as well.
Now, It does have a Wikipedia sort of look to it but you can easily customize it to fit in with your blog’s theme. There are several preset designs to choose from or you can just apply a bit of custom CSS to better match your site’s theme.
Set Links to Top
This is another anchor tag trick, but it can be incredibly helpful for making the navigation of long content a little bit easier for your site visitors. In the HTML editor, establish an anchor at the top of the page. It should look like this:
<a name=”anchor”></a>
Where it says “anchor” you can insert whatever descriptive text you want like “top.” Then, after each section, insert a link that points to this anchor. This link will look like this:
<a href=”#top”>Back to top</a>
Of course, if you don’t feel like doing this manually either, you can use a plugin. Smooth Scroll Up and WPFront Scroll Top are two good options for setting up “back to top” links.

The beauty of these, however, is you can automatically set a smooth animation that shows the page scrolling back to the starting point. Not totally necessary but adds a few style bonus points, to be sure.
Tabs
Another way to better organize your lengthy content for better navigation is to use tabs. WordPress tabs can turn a cluttered, overwhelmingly long page into one that’s easy to navigate and easy to read. The content can be clicked through without having to scroll. It’s more interactive, which means more user engagement. And it’s just plain easier on the eyes than a never-ending sea of text block after text block.
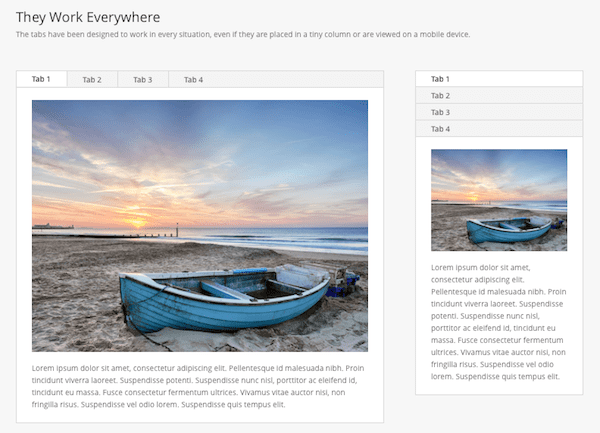
You have a ton of options in terms of how to handle tabs. Our very own Divi theme comes with a tabs module for your convenience. We also have a tabs shortcode that you can use to easily insert tabs wherever you want. This (and many others) come automatically built in to Elegant Themes.
If those don’t work for you, there’s always a few external plugins to try, too like Easy Responsive Tabs and WordPress Post Tabs.
Pagination
The last organizational method you might want to try is pagination. This lets you break your content up into multiple pages automatically for smoother navigation and use. Only, it doesn’t actually separate the content into multiple pages. It just makes a single post look as though it’s existing on several pages. This lets you experience the best of both worlds with lengthy resource-quality content and easy to read, brief pages.
Again, several plugins exist to make this possible like WP-Paginate and Advanced Post Pagination. Just make sure the plugin you choose is designed to add pagination to your posts, not to the blog index itself. Well, I mean you can use that function, too, but that’s not really relevant here.
Organization for Clarity
Now that you have a good idea how to organize your lengthy content for easier navigation, we can focus on some of the ways you can improve the legibility and impact of your content. Basically, you want to make your content as easy to read as possible.
Follow Best Practices for Creating Web Content
Now is not the time to deviate from or experiment with form. It’s a much better idea to stick with what works for your content as it’ll fulfill what your readers expect and it’ll be just plain easier to digest. A few general rules to follow to keep in line with best practices include:
- Keep paragraphs short and sweet. Don’t let people get lost in a sea of text. Allow plenty of white space as breathing room.
- Use lists to break up long content. They draw the eye and help you refine and emphasize key points to your readers.
- Use legible fonts, font colors, and background colors only. Seriously, now is not the time to go all vampire with a black background, red text, and a script font. First, you’ll make people think it’s 1998 and second, you’ll send your potential readers running for the hills.
- Use plenty of subheaders. Just like using short paragraphs and lists, you also need to break up your content into defined sections and subsections. Use h2 and h3 tags to give your content structure and an obvious flow. Plus, this makes it easier to apply a table of contents as we discussed previously, should you be so inclined.
Use Pull Quotes
Another way to instill greater clarity in lengthy content is to use pull quotes. This tactic comes from magazines. You know those bold, large print quotes set off from the main body of an article? Yeah, that’s a pull quote and it works hard in two different ways.
For starters, pull quotes are ideal for skimmers. If someone’s in a hurry and they start scrolling like mad through your content, pull quotes will draw attention to your main ideas and, if you’re lucky, intrigue those in-a-hurry readers enough to slow down and stay awhile. The key here is to make sure those pull quotes are actually interesting. Factual tidbits are fine but save those for lists and infographics. Use pull quotes to highlight the fascinating details that are enticing to readers. And don’t be afraid to be controversial. Capturing attention is the name of the game here.
Pull quotes are also beneficial because they reinforce your main ideas. This is especially important if the purpose of your content is to educate. If you’re trying to teach people how to do something, pull out a few ideas that are particularly important for them to know. Repetition is a main ingredient in the learning process, after all.
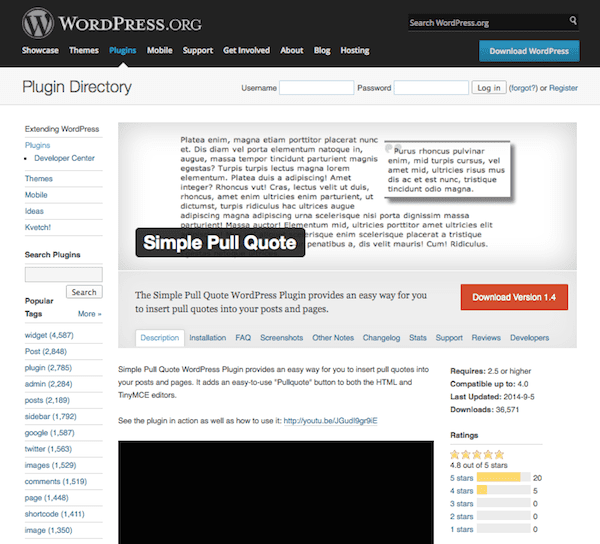
While you can always make simple graphics for your pull quotes, you might find it easier to use a plugin to automatically generate them. Simple Pull Quote is a good example. This plugin adds a TinyMCE button in the WordPress editor that lets you insert a quote anywhere you wish within a post or page. This is really convenient if you envision pull quotes becoming a major staple of your content’s style.
Use Images
Adding clarity to your posts can sometimes be as simple as adding relevant and interesting images. Yes, they’ll make the page longer but they’ll also make it feel more open and easier to digest. Images give your site visitors a second to pause and take a breath. They also offer a natural stopping point. So if you’ve written a book, those graphics offer a place where people will feel comfortable stepping away for a moment without losing their place.
And depending on the length of your content, it might not be feasible for it be read in one sitting, so acknowledging this and building that convenience for your readers into your content will be much appreciated.
Not just any image will do, however. The images you choose need to fit the style and voice of your content. Corporate stock photography isn’t going to come across so great in a tutorial for throwing creative office parties, for instance. However, animated gifs aren’t exactly going to work if you’re writing a comprehensive guide to business plans, either. Think of what your content is trying to accomplish and think of your audience before selecting images.
There are tons of places online to find images for free. Creative Commons Search is my favorite. You can use it to search for license-free images on Flickr, Google Images, and more.
Create Graphics
This serves the same purpose as using images as described above but since you’re creating them, you obviously have more control over what they contain. This is an important distinction and can help turn a good blog post into a great one.
So let’s say you wrote a long post about building your first WordPress site. This would obviously need to be broken down into several different sections from choosing a hosting provider to installing WordPress to choosing a theme. Because each of these topics are broad and cover a lot of ground, creating a mini-infographic to accompany each section can be a real asset.
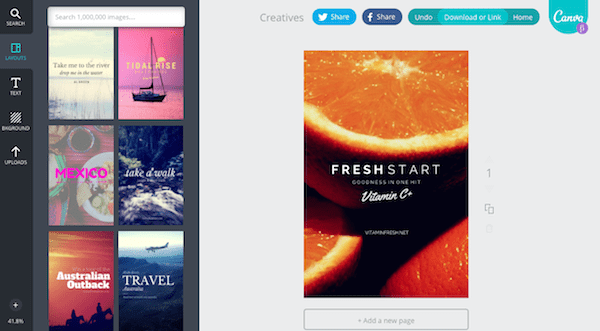
If you lack design skills, don’t worry. Plenty of free tools exist. I’m particularly fond of newcomer, Canva. This service lets you easily create images and graphics that you can insert into your blog posts to add interest and visual appeal. You have tons of layout and design element options to choose from. With just a few quick searches and dragging and dropping, you can create compelling blog images that help you to better tell your story.
You can also use them to act as a recap of the previous section, dishing up the key takeaways or “things you should’ve learned’ before moving onto the next section. This helps reinforce important ideas and gives readers a natural place to stop.
Wrapping Up
I admire those who make it a regular habit to write lengthy content for their WordPress sites. It’s a commitment, to say the least. And while the time spent on the task can feel overwhelming, it’s worth the extra few minutes to get your organization pinned down to perfect. At the end of the day, how visitors interact with your content can make or break it in terms of being reader-friendly and shareable.
If you write long blog posts, what do you do to keep all of that text organized? Do you use any of the ideas we discussed here or do have a few other tricks up your sleeve? Regardless, I’d love to hear the details!
0 comments:
Post a Comment