

 Blogger commenting system is quite simple and very effective commenting system for blogger. But still it lacks many features that are present in Disqus commenting system like we are using here in this blog. But still many blogger still prefer this simple commenting system. Therefore it is quite necessary to include such kind of plugin that will increase your feedback productivity for your visitor. And it does look great.
In this article we will try to increase the capability of your commenting system by adding this plugin. This plugin is quite simple to use and very easy to integrate.
This widget was originally made by Taufik Nurrohman , but in that article only emoticon plugin was provided, but I have edited and had added more plugin to make it more productive and easy to use.
For different types of emoticons click here
This will allow your readers to added their doubt or feedback on your article more effectively. Also this widget allows you to choose which service you want to provide for your readers. You are free to enable one or more than one service to your readers with this plugin.
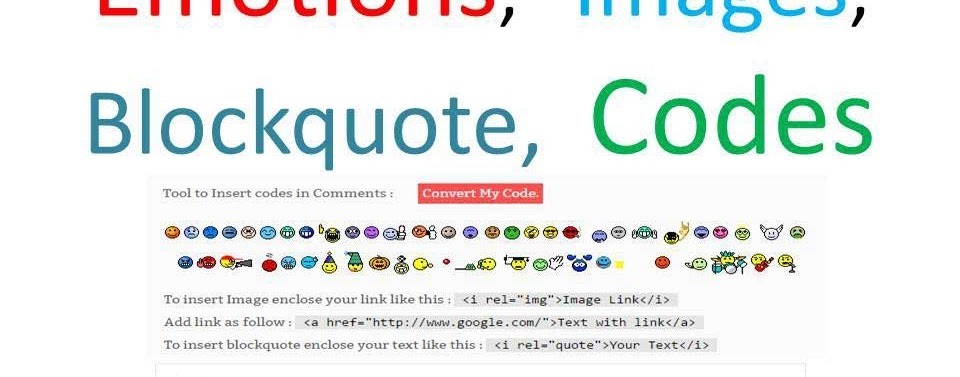
This plugin will provide your readers to not just comment, but it also allows your readers to add Comment with Emoticons and Images.
Also add blockquote and Code snippets,
Before proceeding make sure to back up your template.
To add simply follows these steps:
1: Go to blogger > Template >Edit HTML . Add this following CSS code above ]]></b:skin>
#emoWrap{background-color:#fafafa;padding:10px 14px;color:#000;font:normal bold 12px/normal Tahoma,Verdana,Arial,Sans-Serif;text-align:center}.emo,.emoKey{display:inline-block;*display:inline;vertical-align:middle}.emoKey{border:1px solid #ccc;background-color:#fff;font:normal bold 11px/normal Arial,Sans-Serif;padding:1px 2px;margin:0 0 0 2px;color:#000}#convert-box,#hide-convert,#emoWrap,#hide-emo{display:none}#convert-box{width:100%;background:0 0;line-height:1.6em;margin-bottom:20px}.checkbox{color:#000}#codes{width:100%;height:200px;display:block;background-color:#fff;font:400 12px ':Courier New':,Monospace;margin:7px 0 10px;padding:5px;transition:all .5s linear}#codes:focus{background-color:#fff;color:#666;border:1px solid #ddd;outline:0;transition:all .3s linear}.convertbttn,.emobttn{padding:4px;background-color:#FF4F4F;margin-left:25px}.convert-button,.emo-button{color:#fff!important}.button-group{float:right}.converttitle,.emotitle{background:#fafafa;color:#666;font-size:14px;display:block;line-height:1.2em;padding:16px;border-radius:2px}.comimgtxt,.comquotxt{background-color:#FAFAFA;padding:0 0 0 17px;line-height:28px}.codtext{padding:0 8px;line-height:1.5;font-family:monospace,consolas,sans-serif;font-weight:400;font-style:normal;background-color:#E5E5E5;color:#000}.comimg {width: 400px;display: block;margin: 0 auto;}
2: Now add this JavaScript code above </head>
<script>
//<![CDATA[
var emoRange = "#comments p, div#emoWrap",
    putwidbelow = "iframe#comment-editor",
 allowimage = true,
 allowqoute = true,
 allowemo = true,
 allowcodetool=true;
//remove below code if allowcodetool = false
$(document).ready(function(){
$('i[rel="pre"]').replaceWith(function() {
return $('<pre>' + $(this).html() + '</pre>');
});
});
//]]>
</script>
<script type='text/javascript' src='https://blogeutectics.googlecode.com/svn/trunk/emocode-eutectics.js'></script>
Some tips for advanced user:
You can edit this above JavaScript code to enable particular service for your readers. Like in case you need only emotions in your comments not the other plugin simply edit above code or add this JavaScript.
var emoRange = "#comments p, div#emoWrap",
    putwidbelow = "iframe#comment-editor",
    allowimage = false,
    allowqoute = false,
    allowemo = true,
    allowcodetool=false;
Here
putwidbelow: This variable is use to assign the position of the plugin to appear above your comment box. Change if it is not working.allowimage: This is Boolean variable means it can take only true or false. If you need this plugin to appear for your readers sets its value to true.allowquote: This is also a Boolean variable and it does work just like above one. Sets its value to true if you need it or false if not required.allowemo: This variable will add emotions in your comments if sets its value to true.allowcodetool: This variable will add code converter tool above comment box.
Though I will recommend you to provide all four plugin for your readers. You can see that in above code snippets that I have removed the last code since it will be not required if allowcodetool = false.
The last code will add pre tag before and after your parsed code. In case you are using prettify or Prism syntax highlighter use your syntax accordingly and change your code syntax as shown below.
For prettify use this below code:
$('i[rel="pre"]').replaceWith(function() {
return $('<pre class=”prettyprint”>' + $(this).html() + '</pre>');
});
For prism use this below code:
$('i[rel="pre"]').replaceWith(function() {
return $('<pre><code>' + $(this).html() + '</code></pre>
');
});
If you face any problem do comments. Subscribe us for more interesting article with your email or like/follow us on our social domain.

0 comments:
Post a Comment