Android Century
  • Home
  • Android Zone
    • Android Apps
    • Android Games
    • Apps APk Files
    • Games Apk Files
    • Apps Hack Tricks
  • Reviews
  • Fantasy Zone
    • Entertainment
    • Quotes and Status
    • Life Style
    • Home Made Tips
    • Hair Care
    • Skin Care
    • Fantasy Tips
  • Tricks
    • Free Recharge
    • Free Internet
    • shopping Cashback
    • Recharge Cashback
  • Tech
  • Mobiles
  • Gadgets
  • News
  • How To's
  • Software
Breaking
Error Loading Feed!

Featured post

How to Take Great Photos With Apple's iPhone X

Recent Posts

Labels

  • Android Apk Files
  • Android Apps
  • Android Games
  • Apps Apk Files
  • Entertainment
  • Fantasy Tips
  • Gadgets
  • Hair Care
  • HomeMade Tips
  • How To's
  • News
  • Quotes
  • Quotes & Status
  • Recharge Cashback
  • Recharge Promo Codes
  • Shopping Cashback
  • Technology
  • skin care
Home / How To's / How to Disable the HomeGroup Feature in Windows and How to Remove It from File Explorer

How to Disable the HomeGroup Feature in Windows and How to Remove It from File Explorer

Latest Govt. Jobs 12:44:00 How To's Edit
wdh_top
HomeGroups make sharing files and printers with other PCs pretty simple. But if you don’t use it and would prefer not to see it in File Explorer at all, it’s not too hard to disable.
Windows networking can get pretty complicated. If all you want to do is share your files and printers with a few other Windows PCs on your local network, though, the HomeGroups feature makes that task much easier. Still, if you don’t use it at all and would prefer to not see it in your File Explorer—or Open/Save As dialog boxes—you can disable the HomeGroup service. You’ll need to disable a couple of services and then—if you’re running Windows 8 or 10—take a quick dive into the Registry. Here’s how to get it done.

Step One: Leave the HomeGroup if Your PC is Currently Part of One

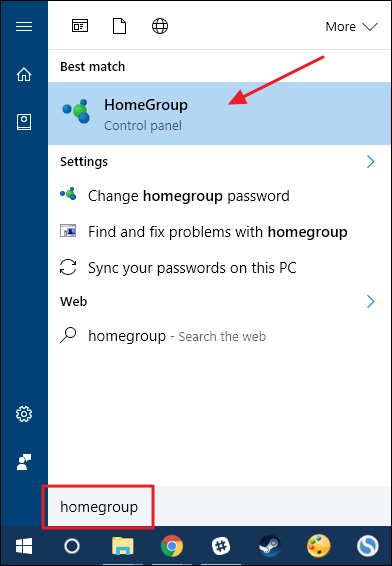
If your PC is part of a HomeGroup, you’ll need to leave the HomeGroup before disabling the service. Click Start, type “homegroup,” and then click the “HomeGroup” control panel app.
wdh_1
In the main “HomeGroup” window, click “Leave the homegroup.”
wdh_2
On the “Leave the Homegroup” window, confirm that you want to leave by clicking “Leave the homegroup.”
wdh_3
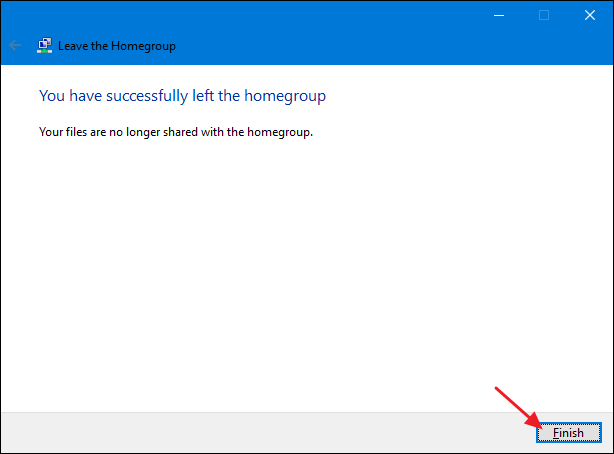
When the wizard finishes removing you from the HomeGroup, click the “Finish” button.
wdh_4
Now that you’re no longer part of a HomeGroup, you can disable the HomeGroup services.

Step Two: Disable HomeGroup Services

To disable the HomeGroup feature in Windows, you’ll need to disable two HomeGroup services. Click Start, type “Services,” and then click the “Services” app.
wdh_5
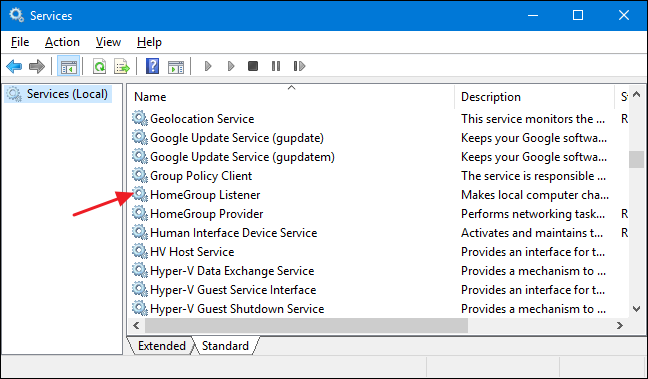
In the right-hand pane of the Services window, scroll down and find the “HomeGroup Listener” and “HomeGroup Provider” services. Double-click the “HomeGroup Listener” service to open its properties window.
wdh_6
In the properties window, select “Disabled” from the “Startup type” drop-down menu and then click “OK.”
wdh_7
Next, you’ll need to disable the “HomeGroup Provider” service in exactly the same way. Open its properties window and set “Startup type” to “Disabled.”
If you’re using Windows 7, that’s all it takes to disable the HomeGroup feature and remove it from your File Explorer window. In fact, as soon as you stop and disable the “HomeGroup Provider” service, HomeGroup will disappear from File Explorer in Windows 7.
If you’re running Windows 8 or 10, the steps you’ve taken so far will disable the HomeGroup feature, but you’ll need to move on to step three and make a quick Registry edit to remove it from the File Explorer window.

Step Three: Remove HomeGroup from File Explorer by Editing the Registry (Windows 8 or 10 only)

In Windows 8 or 10, you’ll need to take the extra step of creating a Registry key that you can use to remove HomeGroup from File Explorer.
Standard warning: Registry Editor is a powerful tool and misusing it can render your system unstable or even inoperable. This is a pretty simple hack and as long as you stick to the instructions, you shouldn’t have any problems. That said, if you’ve never worked with it before, consider reading about how to use the Registry Editor before you get started. And definitely back up the Registry (and your computer!) before making changes.
Open the Registry Editor by hitting Start and typing “regedit.” Press Enter to open Registry Editor and give it permission to make changes to your PC.
own_1
In the Registry Editor, use the left sidebar to navigate to the following key:
HKEY_LOCAL_MACHINE\SOFTWARE\Classes\{B4FB3F98-C1EA-428d-A78A-D1F5659CBA93}
wdh_8
By default, this key is protected, so you’ll need to take ownership of it before you can do any editing. Follow our instructions on how to gain full permissions to edit protected Registry keys and then you can proceed with the instructions here.
After taking ownership of the {B4FB3F98-C1EA-428d-A78A-D1F5659CBA93} key, right-click it and choose New > DWORD (32-bit) Value. Name the new value “System.IsPinnedToNameSpaceTree.”
wdh_9
When you create the new System.IsPinnedToNameSpaceTree value, it’s value data is already set to 0, which is the setting you want for removing HomeGroup from File Explorer. Changes should take effect immediately, so open a File Explorer window and double-check to make sure that HomeGroup has been removed.
wdh_10
If all was successful, you can go ahead and close Registry Editor. If you ever want to reverse this change, just go back into Registry Editor, double-click the System.IsPinnedToNameSpaceTreevalue to open its properties window, and change the “Value data” box from 0 to 1.
wdh_11

How to Re-Enable HomeGroup After Disabling It

If you want to enable HomeGroup again, you’ll just need to reverse the instructions we’ve covered here.
  1. Use Registry Editor to set the System.IsPinnedToNameSpaceTree value to 1 or just delete the value altogether.
  2. Use the Services app to set the “HomeGroup Listener” and “HomeGroup Provider” services back to “Manual.”
You should then be able see HomeGroup in File Explorer and create or join a HomeGroup again.

Even though having the HomeGroup item showing in File Explorer won’t be a big deal to most people, it’s still nice knowing that you can remove it if you want to. It can be especially handy if you share your computer and just don’t want people accidentally stumbling across a way to share your files with other computers.
Share on Facebook Share on Twitter Share on Google Plus

RELATED POSTS


How to Get Free Internet on Idea An...

How to Use DroidVPN App For Free In...

How to HACK Google Play Music App
How to Disable the HomeGroup Feature in Windows and How to Remove It from File Explorer How to Disable the HomeGroup Feature in Windows and How to  Remove It from File Explorer Reviewed by Latest Govt. Jobs on 12:44:00 Rating: 5

0 comments:

Post a Comment

Newer Post Older Post Home
Subscribe to: Post Comments ( Atom )

Search This Blog

TEST BOOK FOR GOVT ENTRANCE TEST

TEST BOOK FOR GOVT ENTRANCE TEST
Find All Latest book for preparation of SSC,RAILWAYBANK PO,RBI,BANK CLERK,GATE ME,GATE CE are available here in less prices, to check out the books click here

Translate

  • Popular Post
  • Random posts
  • Category

Popular Posts

  • Teen Patti Offer 2018: Refer and Earn Flipkart Vouchers Free
    Teen Patti Offer 2018: Refer and Earn Flipkart Vouchers Free
    Teen Patti Refer & Earn Offer:  Hey Guys! Today I make an article about Teen Patti Referral ...
  • KingRoot 4.8.1 (136) APK Latest Version Download
    Download KingRoot Latest Version 4.8.1 In Tools by Developer KingRoot Studio ( 4.x / 5  average ...
  • 11 things you should understand approximately iOS 11
    Apple introduced the following version of its running system for the iPhone and iPad, iOS eleven ...
  • How to Upload Your Music Library to Google Play Music
    Google Play Music offers an unlimited music streaming subscription paired with YouTube Red ...
  • How to Disable Your Mac’s Touchpad When Another Mouse Is Connected
    Laptop trackpads can be annoying. Your palm hits them while you’re typing, moving your cursor ...
  • How to Gain Root Access of An Android Device via KingoRoot Software
    What Does Root Access Mean? Gaining root access of Android is the process of modifying the ...

Random Posts

  • Samsung Galaxy S8’s sign-up page revealed, hints at the phone’s design
    Samsung Galaxy S8’s sign-up page revealed, hints at the phone’s design
    26.02.2017 - 0 Comments
    The image hints at the design of the Galaxy S8 smartphone, which is expected to come with dual curved…
  • How to share your Android phone's connection with Wi-Fi hotspot
    How to share your Android phone's connection with Wi-Fi hotspot
    11.02.2017 - 0 Comments
    Your Android phone is always connected to the Internet, but you might not know that your other devices…
  • NVIDIA Shield review: Android Lollipop 5.1 Coming!
    NVIDIA Shield review: Android Lollipop 5.1 Coming!
    12.02.2017 - 0 Comments
    Rating:  4 Pros:  Incredible power, amazing gaming controls,…
  • How to Send and Receive Faxes Online Without a Fax Machine or Phone Line
    How to Send and Receive Faxes Online Without a Fax Machine or Phone Line
    27.01.2018 - 0 Comments
    Some slow-moving businesses and government agencies may not accept documents over email, forcing you to…
  • HTC One M8 Review: A Subtle Reworking Of What Came Before
    HTC One M8 Review: A Subtle Reworking Of What Came Before
    12.02.2017 - 0 Comments
    HTC has now revealed the HTC One M9 successor at Mobile World Congress 2015. The new model…

Labels

Android Apk Files Android Apps Android Games Apps Apk Files Apps Hack Tricks Entertainment Free Internet Freecharge Gadgets Games Apk Files How To's Laptops Guide Mobiles Reviews Technology Viral's android zone free recharge

Entertainment

Tricks

Popular Posts

  • Teen Patti Offer 2018: Refer and Earn Flipkart Vouchers Free
    Teen Patti Offer 2018: Refer and Earn Flipkart Vouchers Free
    Teen Patti Refer & ...
  • Researchers trick 'CEO' email scammer into giving up identity
    Businesses ...
  • How to Gain Root Access of An Android Device via KingoRoot Software
    What Does Root ...
  • Tinyowl Freecharge Offer – Get 15% Cashback + extra 25% cashback using Freecharge [Ultimatez Tricks]
    Tinyowl Freecharge ...
  • How to Disable Your Mac’s Touchpad When Another Mouse Is Connected
    Laptop ...
  • Infocus Vision 3 review
    What happens when ...
  • EVGA redesigns its graphics cards following overheating concerns
    Following a ...

Random Posts

Most Popular

  • Teen Patti Offer 2018: Refer and Earn Flipkart Vouchers Free
    Teen Patti Offer 2018: Refer and Earn Flipkart Vouchers Free
    Teen Patti Refer & ...
  • SAMSUNG GALAXY J7 (2016) REVIEWS
    SAMSUNG GALAXY J7 (2016) REVIEWS
    SAMSUNG GALAXY J ...
  • Top 5 Best SmartPhones under 7000 Rs (March 2017)
    Looking for the ...
  • Apple, IBM, Cisco are huge because of Indians, do not deny them H-1B visa: RBI Governor Urjit Patel
    ...
  • SAMSUNG GALAXY J7 (2016) Specifications
    SAMSUNG GALAXY J ...
  • BlackBerry Teases Marshmallow Beta Testing for Priv by Next Week
    Blackberry ...
  • LG Q6 Review
    LG Q6 Review
    2017 is ...

Contact Form

Name

Email *

Message *

Offers Zone

Created By Android Century Distributed by Android Century
  • Home
  • About us
  • Contact us
  • Privacy policy
  • Terms of use
  • Advertise here
Subscribe Via Email Subscribe To Android Century By Email And Get Free Updates. ;-)


Your email address is safe with us!